Rabu, 14 Mei 2014
Panko and Herb Crusted Pheasant with Sorrel Cream Sauce

This sorrel cream sauce will make a great condiment for anything that needs an added brightness, like seafood and anything fried. Next time you have fried fish, serve it with this sorrel cream sauce instead of tartar sauce. You will be pleasantly surprised!
Servings: 4
Prep Time: 20 minutes
Cooking Time: 15-20 minutes
Ingredients:
- 4 pheasant breasts
- 2 eggs, lightly beaten
- 1/4 cup of all-purpose flour
- 1 cup of Panko bread crumbs
- leaves from 5 springs of fresh thyme
- 1/2 tsp. of fresh rosemary, finely chopped
- 1 tsp. of kosher salt, plus more to taste
- vegetable oil and/or butter for frying
Sauce:
- 2 cups of sorrel leaves, packed
- 1/2 tbs. of butter
- 1 large shallot, peeled and finely chopped
- 1/2 tsp. of all-purpose flour
- 1/2 cup of heavy cream
- kosher salt and freshly ground pepper, to taste


3. Then whisk in 1/2 tsp. of all-purpose flour to the wilted sorrel. Cook this mixture, which will turn into a paste, for 2 minutes and stirring often. Next whisk in 1/2 cup of heavy cream and bring the sauce to a simmer. Do not boil. Simmer to desired consistency then take off heat. Season with salt and pepper to taste, then set aside, covered.


6. Reheat sorrel cream sauce over low heat. Add more heavy cream to loosen sauce, if desired. Check seasonings, then spoon sauce over breasts or serve on the side. Serve immediately with your favorite side dishes.
To reheat leftover pheasant, bake in a 400 degree F oven for 5-10 minutes or until heated through. They will crisp right up again.

Sabtu, 10 Mei 2014
Indianised French toast with Video
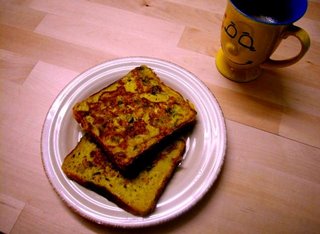
Indianised French Toast with Coffee in my Fav. Mug
Theres a close up for you here...

-------------------------------------------------------
Thanks for all, dear friends your enthusiastic participation. Priya, the first one to guess, hit the nail on the head and pretty much all of you who took a shot :) Teaches me how I must make the guessing games a wee bit more difficult from now on-hahaha
This is one of the quickest things you can make if you have bread and eggs on hand-and if you think an omlette is too boring ! Inspiration for this recipe comes from the good ol canteen in Ogilvy, where people used to keep ordering food to keep their creative juices flowing...(Ogilvy and Mather is a leading worldwide Advertising Agency)
All you will need for the Indianised French toast (Name courtesy Krishnaarjuna) is
4 slices bread (I use whole wheat / multigrain )
2 medium eggs
2 tbsp milk
1 tsp chopped coriander
2 green chillies finely choppes
1/2 onion very finely chopped
1 tsp each of gram flour and rava (Gram flour for the binding and rava for the crispy texture)
Oil / Butter to cook each slice
Salt to taste.
Method:
Put all the ingredients except the bread into a dish. Nicely coat the bread on both sides with the mixture. If the onions / coriander fall off-just stick some of it on each slice with your fingers.
Heat butter / oil in a non stick pan. Once oil is hot enough, put a slice of coated bread. Let it sizzle for about 30 seconds until the egg batter cooks and then turn the slice and cook other side too till golden brown.
Serve hot for breakfast with coffee or as a snack when the weathers all gloomy like how it is now in Bombay with a hot cuppa masala chai to beat the blues away.
Technorati Tags : Breakfast Snack Eggs Indian-snack Bread Eggitarian Cooking in minutes
Selasa, 06 Mei 2014
Christmas Treats with no cooking

Homemade Bounties
8oz dessicated coconut
7oz good quality cooking chocolate
1 small tin condensed milk
2tbsp icing sugar
Mix together in a bowl the coconut, icing sugar and condensed milk. Heat the cooking chocolate over a pan of hot water until a runny considtency. Form the coconut mixture into firm balls, dip into the chocolate and allow to cool on greaseproof paper.
Do not lick your fingers until the very last bountie has been made!
Chocolate Yule Log
4oz (100g) plain dark, good quality cooking chocolate
4oz (100g) plain dark chocolate
2oz (50g) butter
7oz (200g) digestive biscuits
4oz (100g) raisins
2oz (50g) chopped tasted hazelnuts
2oz (50g) glace cherries, quartered
To decorate
4oz (100g) plain dark chocolate
1 tsp icing sugar
1. Put the chocoate and cooking chocolate in a large heatproof bowl with the butter. Stand the bowl over a pan of hot water and stir until chocolate melts.
2. Remove the bowl from the heat. Put the biscuits ina polybag and break them up with a rolling pin until in small chunks.
3. Stir into the chocolate with the raisin, hazelnuts and cherries. Mix together well.
4. Spoon the mix onto a sheet of foil. Fold Foil tightly round the mixture and squeeze it into a thick log shape. Chill until set hard.
5. To decorate: unwrap log and put on a serving plate. Melt remaining cholate in a bowl over hot water. Spread chocolate over log to cover it completely. mark the cholate with a fork so it looks like bark. Leave it to set. Sift a little icing sugar snow over the log. Add a sprig of holly or other Christmassy decoration.
Jumat, 02 Mei 2014
Pasta in fresh home made celery and tomato sauce with a twist

OK! now enough about the bad facts about our favorite pasta now let us learn about some wonderful things about pasta that are published on online journals.
Pasta may help lower the glycemic index of a meal.
When you cook pasta with cheese, meat, vegetables it lowers the glycemic index of the meal.
Lower the glycemic index (GI) more nutritious and filling the food will be. It is one of the recommended food for diabetic patients.
Recipe:
Ingredients:
Pasta 1/2 cup
Water to boil pasta
salt to taste
For sauce:
Celery 1 large stem- finely chopped
Tomato 1large chopped
onion chopped-1/2cup
banana pepper-1 large finely chopped(gives a twist in taste)
oil-2tbsp
red chili powder to taste (optional)
Method
To cook pasta:
To the 3/4pot of boiling water add pasta and salt, cook till pasta is done.

To make the sauce
Add oil t the medium hot pan and when the oil is hot add onion and sauté till tender. Later add celery and banana pepper and cook till it becomes tender, now add tomato, salt and red chili powder. Close the pan and cook it under medium flame till the tomato is finely cooked, keep stirring the mixture in between. Turn off the stove when the mixture is done cooking and let it cool. Add the cooled mixture to the blender and make it to a smooth paste. Pour this mixture in to the same pan that you have used before and heat it add pasta to this mixture and mix well. close the pan and cook it for 2min under low flame. When you are done take the delicious pasta into a serving bowl and serve it hot with salad or any side you like. This is the best pasta dish I ever tasted. Celery adds a special flavor to the dish and banana pepper gives a special twist in taste. We enjoyed I hope you will love it!
Jumat, 25 April 2014
Baked Aubergine and Bell Pepper Stuffed with Lamb Sheikh El Mahshi شي� المحشي باذنجان و فلفل حلو

The stuffed vegetables most popular for sheikh el mahsi are aubergine and to a lesser extent zuchinni. In my family there are a few people who dont eat either so we added sweet bell peppers, which work really well with the flavors of this dish. It also makes a variation from the traditional Libyan stuffed bell peppers recipe, filfil mahshi. This adaption of sheik el mahshi combines bell peppers and aubergines filled with a lamb and aubergine mix, then baked in tomato sauce and sprinkled with pine nuts.
Filling
about 50g butter
1 chopped medium onion
1 cup boiling water
1 tsp black pepper
1 tsp cinnamon
1 tsp salt
2 tbsp dry mint
for decoration
1/2 cup pine nuts (or blanched almond )
Sauce
3-4 tablespoon olive oil
1 grated garlic clove
1 chilli finely chopped
1 tablespoon tomato paste
4 finely chopped tomatoes (or tin of chopped tomato)
1 teaspoon salt


Cover with foil and bake for about 1/2 hour at 250. Remove the foil and cook for anothr 15 minutes.

Rabu, 23 April 2014
Gluten Free Chocolate Brownies Recipe with Pecan Meal
 |
A rich, gluten-free chocolate brownie with pecan flour. |
What does Mother Nature think this is, December?
Oh. Wait.
Jumat, 28 Maret 2014
Cook Great Meals With These Cooking Tips
When you are cooking, dont be afraid to be creative. You do not have to follow a recipe to the "T". Give the recipe your own personal twist by leaving an ingredient or two out, substituting, or adding something. These little changes can result in an exceptionally good dish that is better than the original recipe! Now thats real cooking!
If youre dealing with a vegetable or fruit that you arent familiar with, you should take the time to learn more information about it. By performing some research, you could be surprised at how versatile a new food can be. The better prepared you are before you start, the better your kitchen experiences will be.
If you want to lose weight and eat healthier, cut back on the amout of oil that you cook with. Butters and oils contain unnecessary fats. Try using nonstick cooking spray instead: this product does not contain anything unhealthy and works just like oil.
By doing this, fruits can stay fresh all through the year. Another great benefit is that you will have certain fruits on their off season.
Theres almost always leftovers after serving turkey. Rather, cut up the meat and store in in the freezer. Frozen turkey will keep for weeks in the freezer and can be unfrozen and used for a variety of dishes.
Improper storage techniques wont ensure they will last from harvest through the winter months, which is when they are most often desired for inclusion in recipes. Apples need to be kept loosely in plastic bags while in your refrigerator or basement because they rot in dry, warm air. Make sure you check them periodically, however, because even one spoiled apple can cause the others in the bag to rot very rapidly.
A lot of preparatory work can be done ahead of time in order to speed up time spent cooking. Examine recipes and identify which preparations can take place well in advance without risking spoilage. Many different prep tasks can be finished a day or so before cooking the meal. This can make even the most difficult recipes fun and easy.
If preparing dinner becomes overwhelming, try to get some of the prep work done the night before. Easy ways to prep in advance include cutting up any ingredients that needs chopping, throwing together the ingredients for any sauces or marinades or assembling a casserole before you head to bed for the night. You will be a much happier cook if you do not have to do as much the next day, resulting in less stress.
The ability to cook will always come in handy, whether you want to feed your family or romance a prospective beau. Sharing meals is a common tradition among cultures across the globe. Use the guidelines suggested in this article to get you started on the path towards cooking perfection.
Sabtu, 22 Maret 2014
Burritos with chicken and rice

Ingredients
- Rice 100g
- Finely chopped onions 1
- Chicken breast 2
- Boiled and finely chopped tomatoes 3
- Cheddar cheese 100g
- White Flour 100g
- Flour 100g
- Oregano 1tsp
- Clove powder 1/2tsp
- Black pepper powder 1/2tsp
- Tomato paste 2tbsp
- Oil 2tbsp
- Fresh cream 3tbsp
- Water as required
- Salt as required
- Boil 100g of rice and keep aside.Heat 2tbsp of oil in a pan and fry 1 chopped onion,1/2tsp cloves powder and 1tsp oregano. Fry for 2-3 minutes.Add the boiled rice, 3 boiled and chopped tomatoes and 2tbsp tomato paste. Mix well and simmer for 3-4 minutes. Remove from the stove.
- In a separate saucepan boil the chicken breasts with water, remove and allow to cool. Then shred the chicken fillet and keep aside.Mix the shredded chicken with the boiled rice Add the grated cheese, along with 3tbsps of fresh c ream.
- In a separate bowl mix together 100g flour,100 white flour salt and water .Knead till a smooth dough is formed.Divide the dough into equal portions and shape int0small round balls. Roll out each ball of dough into discs , grease a griddle and cook the rolled out dough until done.
- Lay cut out pieces of aluminum foil and place the tortillas on top of each foil. Place a spoonful of the rice mixture on each tortilla , wrap and serve.
Kamis, 20 Maret 2014
Salmon with leek

Ingredients
3 to 4 boneless salmon fillets
3 leeks
1 onion
2 cloves garlic
2 carrots
dill
1 lemon (juice)
olive oil
oregano
salt
pepper
parsley for garnish
Finely chop the leeks, carrots, onion, garlic and dill. Place the salmon and cut vegetables on baking paper.Put salt, pepper, oregano, lemon juice and olive oil.
Fold the baking paper and place them in a pan. Bake in preheated oven at 190 degrees Celsius (375 Fahrenheit - air function) for 35 - 40 minutes.
Garnish with chopped parsley and serve!
Bon Appétit
Extra information
Salmon Omega-3
Lemon = vitamin C and antioxidants
leeks = folic acid
oregano = Vitamin A & C
Smiles Maria
Senin, 17 Maret 2014
SANDRAS GERMAN CHOCOLATE BROWNIES with BERRIES and CREAM
 |
| A lovely dessert that will more than likely keep you coming back for more... |
Bake: 30 to 35 mins
Posted by Sandra
INGREDIENTS:
1 cup unsalted butter, melted
2 cups granulated sugar
1/2 cup unsweetened cocoa powder
2 teaspoons vanilla extract
4 large eggs, lightly beaten
1 cup all-purpose flour, sifted
1/2 teaspoon baking powder
1/2 teaspoon fine-grained kosher salt
1/2 cup pecans, finely chopped
1/4 cup grated, sweetened coconut, chopped finer
Garnish options:
Fresh strawberries, raspberries, and prepared whipped cream
--(If you wish to macerate* your berries, see Tip below)
METHOD
Preheat oven to 350 degrees.
Melt the butter in microwave; add to large bowl, along with remaining ingredients in the order listed.
Line a 9x13 baking dish with foil and spray with oil (leave overhanging edges to form handles for removing after baking). Add the batter to the prepared baking dish, and bake for 30 to 35 minutes, until a toothpick inserted in center comes out clean.
Cool completely. Remove foil, cut into squares, and serve as shown in the photograph above. - Enjoy!
~~~~~~~~~~~~~~~~~~~~~~~~~~~
Senin, 10 Maret 2014
A Cool Weather Rerun Mascarpone Butternut Squash Ravioli with Brown Butter and Sage
 I saw a great looking butternut squash today at the market, but for whatever reason I didnt buy it. Later in the afternoon I was checking some files on YouTube when I came across the pasta recipe below – my video for butternut squash ravioli!
There it was, mocking me and my lack of butternut squash with which to make it. So, I decided to do the next best thing and repost it. Its a great recipe and perfect for this time of year. By the way, you freakishly small wooden spoon fans will be happy to know le petit bois makes an appearance. Enjoy!
Here is the link to the original post complete with ingredients!
Rabu, 05 Maret 2014
Gorgonzola Cream Sauce – Now with Cream!

Unlike what’s passed off as the real stuff at casual dining chains, a true cream sauce contains nothing but heavy cream, and is on another level when it comes to taste and texture. A regular diet of cream sauce isn’t recommended, but once in a while, it’s nice to take a break from the old 2%, and the technique is dead simple. Simmer cream in a saucepan until it reduces and thickens slightly, flavor it however, and toss in some hot (hopefully stuffed) pasta. Done and done.

Selasa, 04 Maret 2014
Parangikkai Puli Kuzhambu Yellow pumpkin gravy with tamarind


Jumat, 28 Februari 2014
SANDRA’S SMOKY KIELBASA with ORGANIC SNAP PEAS N’ MUSHROOMS over RICE
 |
| This is so fast and easy to have a delicious meal on the table in under 30 minutes... |
Prep/Cook: 30 Mins.
1-1/2 cups basmati rice
3 cups water
½ teaspoon light olive oil
½ teaspoon sea salt
1 lb. smoked kielbasa, sliced lengthwise, and sliced again into bite size pieces)
2 handfuls of fresh organic sugar snap peas, inner and outer strings removed
2 organic garlic cloves, minced
6 organic crimini mushrooms, sliced
freshly ground pepper, to taste
1 pkg. dry Lipton onion soup mix
1 cup Alaskan Amber beer
2-1/2 tablespoons cornstarch (or more, if you prefer a thicker gravy)
Selasa, 25 Februari 2014
Spinach Ravioli with Chicken Mushrooms
Spinach is probably becoming more widely available right now, but ours is almost over. It always seems to bolt by midsummer. Im pulling a lot of it out already.
60 raviolis (10 to 12 servings)
1 hour prep time not including making the pasta

Make the Filling:
2 large green onions, white and light green parts only
1 clove garlic
6 to 8 button mushrooms
1 tablespoon mild vegetable oil
1 teaspoon rubbed basil
1/2 teaspoon salt
1/4 teaspoon ground black peppercorns
250 grams (1/2 pound) ground chicken
Wash, trim and finely chop the white and light green parts of the onions, reserving the green tops for the sauce. Peel and mince the garlic. Clean and chop the mushrooms finely.
Heat the oil in a skillet and cook the mushrooms and onions until soft. Add the garlic, basil, salt and pepper, and cook for a minute or two longer. Turn the mixture out into a bowl to cool.
Add the ground chicken and mix in well.
Make the Ravioli:
1 recipe Spinach Pasta
Divide the pasta into 4 portions, and roll each portion out as thinly as possible. Cut out circles of pasta with a 2" round cutter.
Put a teaspoon of the filling onto half the circles, and top with a second circle. Press the dough circles together around the edges to seal. It will likely be necessary to wet the edges to achieve a good seal. Set the ravioli aside on a clean tea-towel or piece of parchment paper as you make them. They could be kept, well wrapped in the fridge, for several hours before they are to be cooked. They could also be frozen, and thawed before being cooked.
To cook the ravioli, bring a large pot of salted water to a boil. Add the ravioli and boil until tender, about 12 to 17 minutes. Drain well and serve with the sauce.
Make the Sauce:
8 cups spinach leaves
12 to 16 button mushrooms
2 large green onions, green parts only
2 tablespoons butter
3 tablespoons flour
1 1/2 cups chicken stock
1 cup light cream
Wash and pick over the spinach leaves, and chop them coarsely. Set them aside to drain well.
Clean and slice the mushrooms. Use the green onion tops from the filling, and chop them in centimetre pieces.
Heat the butter in a large, heavy bottomed pot. Cook the mushrooms until soft and lightly browned. Add the green onion tops and cook them down for a minute or two. Sprinkle the flour over and mix in well. Continue cooking and strring for a minute or two.
Add the chicken stock, stirring well until the sauce is smooth. Add the cream and the chopped spinach, and continue cooking and stirring until the spinach is cooked and the sauce is slightly thickened.
Serve over the cooked, drained ravioli.
Sabtu, 22 Februari 2014
Roast Lamb Shoulder with Cranberry Nut Buckwheat Dressing
The bits about toasting it and dropping it into water that has already reached a boil are important. Otherwise, it can get sadly soggy and mushy, and then no-one will be very excited about it. Also, it was a happy day when they first started to sell pistachios already shelled. I suggest you look for them.
6 to 8 servings
2 1/2 hours, not including cooking the buckwheat - 40 minutes prep time

Cook the Buckwheat:
1 cup buckwheat
2 teaspoons mild vegetable oil
1/4 teaspoon salt
1 1/2 cups water
Heat the oil in a large skillet, and add the buckwheat. Cook, stirring frequently, until the oil is absorbed and the buckwheat is toasted. Remove it to a plate to cool. Put the water and salt into a pot and bring it to a boil. When it boils, add the buckwheat. Cover and reduce the heat to a simmer. Cook for 10 to 15 minutes, until the water is absorbed. This can be done up to a day in advance, and kept in the fridge until wanted.
Make the Dressing:
1 small onion OR 2 or 3 shallots
2 or 3 stalks of celery
1 tablespoon mild vegetable oil
1 teaspoon dried rosemary leaves
1 teaspoon black peppercorns
1/2 teaspoon sea salt
the finely grated zest of 1/2 large lemon
1/2 cup shelled pistachios
1/2 cup dried cranberries
the juice of 1/2 large lemon
Peel and chop the onion or shallots. Wash, trim and chop the celery. Heat the oil in a large skillet and sauté the onion (shallots) and celery until soft and slightly browned. Meanwhile, grind the rosemary and pepper. Add the seasonings to the pan, along with the finely grated lemon zest and the pistachios and cranberries, and mix well. Remove the pan from the heat and let cool enough to handle. Mix in the lemon juice.
Stuff and Roast the Lamb:
1 boneless lamb shoulder, about 2.5 kilos or 4 to 6 pounds
lamb or beef stock, OR water
Preheat the oven to 450°F.
Remove the string or elastic bag holding the shoulder together, and spread it out in a baking pan. Spread the dressing over it and fold it closed again. Tie it back together so as to surround the dressing with the lamb. The pan should be of a size to hold the prepared roast somewhat snugly. If you cant get all the dressing in (probably not) arrange whatever is left around the roast. Add enough stock or water to cover the bottom of the pan by about a quarter inch.
Bake the lamb at 450°F for 20 minutes, then reduce the heat to 325°F and cook for a further hour to hour and half, depending on the size and thickness of the lamb and the degree of doneness desired. Let rest for about 10 minutes before serving.
Last year at this time I made Curried Noodles with Vegetables.
Teasing You with My Cousin Tonys Sausage
 When my visiting cousin Tony told me he was making homemade sausage for us, I asked him if I could film it, as I knew some of you would enjoy seeing that process. So, it really is too bad that I sucked as cameraman.
I was running in and out of the kitchen, trying to work on other things - I was hitting record too late, or stop record too soon - so, I just missed too many shots to have the recipe make sense.
Undaunted, I decided to edit what I had, to tease you until I film one myself. As I say in the clip, making sausage at home is really not that hard, and I may even do a version that doesnt need a Kitchen Aid grinder. Stay tuned!
Rabu, 19 Februari 2014
Penne Pasta with Arrabbiata Sauce

Ingredients:
1. 3 cups cooked penne pasta
2. 1 can peeled tomatoes
3. 1/4 cup chopped basil leaves
4. 4 tablespoon olive oil
5. 5 to 6 cloves garlic chopped
6. 2 fresh red chilies chopped
7. 5 to 6 black olives (optional)
8. 1/2 cup shredded cheddar cheese
9. Salt to taste

1. In a pan add the oil, chopped garlic and chilies.
2. Let them sauté about a minute and after add the chopped can tomatoes.
3. Stir it well and let it cook for few minutes.
4. Now add chopped basil and pasta mix well.
5. Add some salt, olive and cheese, mix it.
6. Preferably in warm plate. Serve at once. Enjoy!
You may also like:


SANDRAS CHOCOLATE BUNDT CAKE with CHOCOLATE BUTTERCREAM SPRINKLED with PISTACHIOS
 |
| A chocoholics dream dessert... |
Prep: 15 mins. |
Cook 50 mins.
Posted by Sandra
INGREDIENTS:
***Cake
· 2 cups granulated sugar
· 1-3/4 cups all-purpose flour
· 3/4 cup unsweetened chocolate powder (I prefer Hershey’s)
· 1-1/2 teaspoons baking powder
· 1-1/2 teaspoons baking soda
· 1 teaspoon salt
· 2 large eggs
· 1 cup milk
· 1/2 cup vegetable oil
· 2 teaspoons vanilla extract
· 1 cup boiling water
***Chocolate Buttercream: (Yields about 2 cups)
- 3 cups confectioners sugar
- 2/3 cup unsweetened chocolate powder (Again, I prefer Hershey’s)
- 1 cup unsalted butter, at room temp.
- 1 teaspoon vanilla extract
- 3 to 4 tablespoons of milk
***Garnish
- ¼ cup pistachios, chopped
METHOD:
--Bundt Cake: Heat oven to 350 degrees. Grease and flour a 12-cup bundt pan. Stir together sugar, flour, chocolate powder, baking powder, baking soda and salt in large bowl. In a small bowl whisk the eggs, milk, oil and vanilla, then add to dry ingredients in large bowl. Beat mixture on medium speed for 2 minutes. Stir in boiling water (batter will be thin). Pour batter into prepared bundt pan. Bake for 50 minutes or until a toothpick inserted in center comes out clean. Cool in bundt pan for 15 minutes, and then remove and place on a wire rack to cool completely.
--Chocolate Buttercream: Meanwhile, begin making the buttercream. Sift the confectioners’ sugar and chocolate powder through the cleaned sieve into a large bowl (do not skip this step as it makes for a creamier frosting). With a hand mixer, begin by adding the butter and mix with sugar on low speed until well blended, and then increase speed to medium and beat for another 3 minutes. Add vanilla extract, and milk, and then continue to beat on medium speed for 2 more minutes, adding additional cream a bit at a time if needed for your desired consistency (see photograph). Frost your cooled bundt cake, and sprinkle top with pistachios. - Enjoy!
Red hot Thai curry with basil

Lemon grass cafe in Bandra is one of my favourite restaurants. They serve a variety of Oriental food. Thai, Singapore, Malaysian, Indonesian, Vietnamese...you name it they have it on the menu. And unlike a run-of-the-mill oriental restaurant, they dont add soy sauce to everything!
I tried re-creating their Ginto (Raw papaya salad) at home, and to our delight it came out exactly the way I wanted it to. Will probably blog about that when I buy raw papaya from the market. I dont like the vague sweetness in food belong to certain Asian cuisines due to use to peanuts and a sweeter version of soy sauce. Spicy Thai red curry is therefore one of my all time favourites. Somehow, I could never lay my hands on an authentic recipe for Thai red curry. I then decided to put together my own ingredients from the tastes Ive remembered from my visit to the Lemongrass cafe.
The flavour is heightened with generous use of fresh basil.
Ingredients-
5 dried red chillies ( I used the bedki variety)
8 cloves garlic peeled
1 medium sized onion-roughly chopped
1/4 cup tightly packed basil leaves
1/4 cup thick coconut milk ( I used Dabur homemade)
1 tub fresh mushrooms (wiped thoroughly and chopped roughly)
2 green peppers-chopped roughly
1/2 cup frozen peas.
2 tbsp tomato puree
Salt
Turmeric -pinch
1 tbsp peanut oil / vegetable oil
Method-
1. In a saucepan, take a cup of water. Add the chillies, garlic, onion. Bring to a boil and simmer for 7-8 minutes, till the spices have softened. Remove in a bowl and cool.
2.Once cooled, grind the spices with the basil leaves to a fine paste adding a little bit of water which was used for boiling. In case you dont have tomato puree, you can grind a big tomato into the paste.
3. In a pan, heat the oil. Saute the green peppers with a pinch of tumeric and salt, for 3-4 minutes, then add the mushrooms, peas and saute till almost cooked.
4. Add the red paste, tomato puree, coconut milk, salt to taste. Garnish with freshly chopped basil.
If you thought that was too hot, cool off with my entry to Meetas Beat the heat- a tall glass of Ginger lemon iced tea.
Notes-
~Serve hot with rice / noodles.
~I served this with instant sevai (Indian rice noodles) and the combination was just perfect. The curry wasnt over the top spicy-probably because the chillies were boiled in water. You can add or subtract the number of red chillies as per your heat-tolerance.
~Thai red curry served with steamed rice and Ginto makes a great dinner combination.
Tags-Spicy food, curry, Thai curry, Basil