Rabu, 14 Mei 2014

Panko and Herb Crusted Pheasant with Sorrel Cream Sauce

Recipe by Jen

When you live in (or near) the country, there is no shortage of produce. You will be bound to meet a few friends who tend to garden faster than they could eat, and in the summer, theyll try to offer you as many tomatoes, squashes, cucumbers and apples as they can, which you will gladly accept because homegrown veggies and fruits are always better than store-bought. But this summer was a special one. This summer I discovered sorrel, which my good friend April gave to me. This lemon-like, tangy herb makes a wonderful, creamy French soup that I have totally fallen in love with. Its also easy to grow and is very pest resistant. When Rick and I get an opportunity to keep a garden, sorrel will be one of the first things that I will grow. And now that fall is here, I feel the need to highlight it in one of our dishes-- before it gets too cold for April to give me any more of this awesome green. :-) 

This sorrel cream sauce will make a great condiment for anything that needs an added brightness, like seafood and anything fried. Next time you have fried fish, serve it with this sorrel cream sauce instead of tartar sauce. You will be pleasantly surprised!

Servings: 4
Prep Time: 20 minutes
Cooking Time: 15-20 minutes
Ingredients:
- 4 pheasant breasts
- 2 eggs, lightly beaten
- 1/4 cup of all-purpose flour
- 1 cup of Panko bread crumbs
- leaves from 5 springs of fresh thyme
- 1/2 tsp. of fresh rosemary, finely chopped
- 1 tsp. of kosher salt, plus more to taste
- vegetable oil and/or butter for frying
Sauce:
- 2 cups of sorrel leaves, packed
- 1/2 tbs. of butter
- 1 large shallot, peeled and finely chopped
- 1/2 tsp. of all-purpose flour
- 1/2 cup of heavy cream
- kosher salt and freshly ground pepper, to taste


1. To make the sauce, wash sorrel leaves thoroughly. Remove the center ribs and stems, then give the leaves a rough chop and set aside. 
2. Next, melt 1/2 tbs. of butter in a saucepan over medium-low heat. Add chopped shallot and sauté until softened, about 2-3 minutes. Then add sorrel leaves and a pinch of salt. Stir often until leaves are wilted and tender, 5-10 minutes.

3. Then whisk in 1/2 tsp. of all-purpose flour to the wilted sorrel. Cook this mixture, which will turn into a paste, for 2 minutes and stirring often. Next whisk in 1/2 cup of heavy cream and bring the sauce to a simmer. Do not boil. Simmer to desired consistency then take off heat. Season with salt and pepper to taste, then set aside, covered.
4. Lay 1 pheasant breast between two sheets of plastic wrap. With a mallet, flatten pheasant breasts until about 1/4-1/2 inch thick and repeat with the others. Season all sides with salt and pepper then set aside.
5. In a dish or wide bowl, combine Panko bread crumbs, thyme, rosemary and 1 tsp. of salt. 
Then dredge flattened breasts in this order: flour, egg and Panko. 
Next, deep fry or pan fry coated pheasant breasts until thoroughly cooked and golden brown all over, about 2-3 minutes each side. I like to pan fry in a combination of both butter and vegetable oil.

6. Reheat sorrel cream sauce over low heat. Add more heavy cream to loosen sauce, if desired. Check seasonings, then spoon sauce over breasts or serve on the side. Serve immediately with your favorite side dishes. 

To reheat leftover pheasant, bake in a 400 degree F oven for 5-10 minutes or until heated through. They will crisp right up again. 
Read More..

Selasa, 13 Mei 2014

Rosemary Garlic Rutabaga

Rutabaga is, in my opinion, a grossly under-rated vegetable. Its delicious all on its own, but it dresses  up really well too. 

Just to give you another way of measuring the rutabaga, you want about half of a large one. Im saying 2 to 4 servings, but this is awfully good so 2 is probably more accurate, unless you are serving a lot of other choices at the same time. 

2 to 4 servings
30 minutes - 20 minutes prep time

Rosemary-Garlic Rutabaga

500 grams (1 pound, 3 cups diced) peeled, diced rutabaga

3 to 5 cloves of garlic
2 tablespoons unsalted butter
1 large sprig fresh rosemary (24 leaves or so)
salt & pepper to taste

Peel and dice the rutabaga, and put it in a pot with water to cover it. Bring it to a boil, and boil for 15 to 20 minutes, until tender.

Meanwhile, peel and finely mince the garlic. Heat the butter gently in a small skillet with the rosemary sprig. Monitor it carefully; you want it to be hot enough to slowly brown and infuse the rosemary, but it should happen slowly, over 5 or 10 minutes. Dont let the butter turn brown at once, or it will be overcooked!

When the rutabaga is cooked, drain it well and mash it. Remove the rosemary sprig from the skillet of butter, and add the garlic. Cook gently for one minute, until fragrant but not browned. Add the mashed rutabaga, and mix it in well. Allow it to heat through again, then remove it to a serving dish.
Read More..

Senin, 12 Mei 2014

Salami Spinach and Bacon Hash

One of the things that didn’t make my list of “Things My 21-Year-Old Self Would Be Embarrassed to Know About My 28-Year-Self” post is my Saturday morning routine. For the past couple months, I’ve kicked off the weekend by rolling out of bed, only to roll onto the couch and watch back-to-back cooking shows on Food Network, specifically, The Pioneer Woman, Barefoot Contessa, and of course, Giada at Home. 

While I don’t know what’s more embarrassing—that I do this or that I just admitted to you that I do this—what I do know is Giada looks like a real-life caricature of herself. Like, literally, if the woman went to a theme park in her denim cut offs, holding an oversized stuffed animal that her husband won for her buy tossing rings onto something, munching on a churro and passed a caricature stand where they draw you with an oversized head, teeth, and boobs bobbling atop a teeny, tiny body, that’d be her IRL. 


Despite the line of medical marvel Giada walks each day by miraculously NOT toppling over, the woman does manage to come up with some clever recipes, even if they haven’t been Italian since 2007. This past weekend, she whipped up a kind of hash with salami, bacon, and spinach that I knew Kyle would love. 

I made the predictable swap of cauliflower for potatoes and added an extra egg to the recipe, because why not, and was incredibly happy with how it turned out. 


All in, this hash will take about an hour to make, what with all the chopping and the sautéing of veggies, but if the life-sized bobble-head can persevere through her deformity and finish it, so can you!

Salami, Spinach, and Bacon Hash
Makes 5 large servings
Adapted from Giada at Home

  • 5 pieces bacon, chopped into 1/2 inch cubes
  • 1 medium head cauliflower, chopped into 1 inch chunks
  • 1 tsp. salt
  • 1/2 tsp. pepper
  • 2 Tbsp. olive oil
  • 1 medium onion, diced
  • 1 yellow bell pepper, seeded and chopped into 1/2 inch pieces
  • 3 cups baby spinach
  • 3-5 ounces dry salami, cut into 1/2 inch cubes (I used 5 and felt like we had a LOT of meat in here, so I would probably use only 3 ounces next time)
  • 1/2 tsp nutmeg
  • 5 eggs
1. In a large pan, cook bacon pieces until crispy. Remove from the pan with a slotted spoon onto a paper towel, leaving the fat in the pan.
2. Saute the cauliflower in the pan of bacon fat. Add salt and pepper. Stir frequently until cauliflower is tender and browned on all sides--about 20 minutes. Remove cauliflower from the pan and drain on paper towel.
3. Add olive oil, onion, and bell pepper to the pan with a pinch of salt and pepper. Saute until onions are soft and translucent. 

4. Add spinach, salami, and nutmeg and more salt to taste. Saute until spinach is wilted, about 3 minutes.
5. Stir back in the bacon and cauliflower and heat through.
6. Roughly space out 5 indentations in the hash. On top of each indentation, crack an egg. Cover pan with lid to allow eggs to cook through (I like my runny, which took about 3 minutes). 
7. Cut into hash like a pie and serve hot.

Read More..

Minggu, 11 Mei 2014

SANDRA’S 15 MINUTE SWEET and SOUR ALASKA HALIBUT

Our all-time ‘go to’ favorite
sweet and sour halibut 
we end up craving
from time to time...

Serves: (6)
Prep/Cook: 15 minutes

INGREDIENTS

1/4 cup dark brown sugar
2 tablespoons cornstarch
1/3 cup cider vinegar
1-½ cup low-sodium chicken broth
¼ cup low-sodium soy sauce
2 tablespoons all-purpose flour
½ teaspoon kosher salt
½ teaspoon freshly ground pepper
1 lb. boneless skinless halibut fillets, cut into 1” cubes
2 tablespoons olive oil
½ red bell pepper, cut into 1” pieces
½ yellow onion, cut into 1" pieces
Pinch of crushed red pepper flakes
1 (8 oz.) can of pineapple chunks, drained and cut in half (reserve ¼ cup of juice)
½ teaspoon ground ginger

--Prepared steamed rice

METHOD

In a bowl, combine brown sugar and cornstarch. Stir in cider vinegar, broth, soy sauce, and reserved pineapple juice. Set aside.


In a resealable plastic bag combine flour, salt and pepper. Add halibut cubes and shake to coat. 


In a small skillet, saute halibut in oil over medium-high heat for 4-6 minutes, just until lightly golden and halibut flakes easily with a fork; remove to a plate. Set aside.


In the same skillet, saute red pepper, onion, red pepper flakes for 4 to 6 minutes, just until vegetables are crisp-tender. 


Add ground ginger, and pineapple to skillet.  


Stir sauce in bowl then add to skillet while scraping up bits from bottom, and bring to a boil.


Cook while stirring for 2 minutes, until thickened. Reduce heat to low, and return halibut chunks to skillet; heat through for a couple of minutes. 


Serve over steamed rice. ~ Enjoy!

~~~~~~~~~~
Tip: Feel free to substitute halibut with the same amount of chicken, pork, or beef, although adjust cooking time accordingly.

Read More..

Sabtu, 10 Mei 2014

Indianised French toast with Video
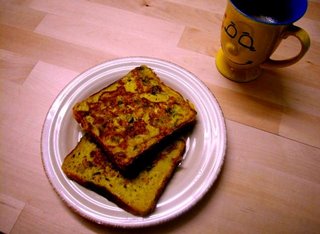
This is one thing you can make from start to finish in under 5 minutes. Can you guess 3 of the ingredients that have gone into making this one? Other than the BREAD ofcourse.
And if you can guess what the dish is, nothing like it!!


Indianised French Toast with Coffee in my Fav. Mug

Theres a close up for you here...


-------------------------------------------------------

Thanks for all, dear friends your enthusiastic participation. Priya, the first one to guess, hit the nail on the head and pretty much all of you who took a shot :) Teaches me how I must make the guessing games a wee bit more difficult from now on-hahaha

This is one of the quickest things you can make if you have bread and eggs on hand-and if you think an omlette is too boring ! Inspiration for this recipe comes from the good ol canteen in Ogilvy, where people used to keep ordering food to keep their creative juices flowing...(Ogilvy and Mather is a leading worldwide Advertising Agency)

All you will need for the Indianised French toast (Name courtesy Krishnaarjuna) is

4 slices bread (I use whole wheat / multigrain )

2 medium eggs

2 tbsp milk

1 tsp chopped coriander

2 green chillies finely choppes

1/2 onion very finely chopped

1 tsp each of gram flour and rava (Gram flour for the binding and rava for the crispy texture)

Oil / Butter to cook each slice

Salt to taste.


Method:

Put all the ingredients except the bread into a dish. Nicely coat the bread on both sides with the mixture. If the onions / coriander fall off-just stick some of it on each slice with your fingers.

Heat butter / oil in a non stick pan. Once oil is hot enough, put a slice of coated bread. Let it sizzle for about 30 seconds until the egg batter cooks and then turn the slice and cook other side too till golden brown.

Serve hot for breakfast with coffee or as a snack when the weathers all gloomy like how it is now in Bombay with a hot cuppa masala chai to beat the blues away.

Technorati Tags : Breakfast Snack Eggs Indian-snack Bread Eggitarian Cooking in minutes

Read More..

Jumat, 09 Mei 2014

SANDRA’S LUSCIOUS RHUBARB RASPBERRY CRUMBLES Individual mason jar servings

A phenomenally luscious springtime quick, easy, and tasty dessert
using in-season fruit and berries...


Prep: 5 Mins.
Macerate: 10 Mins.
Bake: 40 to 45 Mins.
Serves: (9) ½-Pint Jars (Wide/Slim: Whatever you have on hand)

INGREDIENTS:

Filling:
2 lbs. fresh rhubarb (7 measured cups, already cut into ½” slices)
2 teaspoons fresh lemon zest
--(Or, ¼ teaspoon organic lemon peel powder)
2 tablespoons freshly squeezed lemon juice
¾ cup granulated sugar
½ cup all-purpose flour
1 teaspoon vanilla bourbon extract
-- (Or, vanilla extract)
1 teaspoon organic cinnamon powder
--(Or, ground cinnamon)
2 cups (1 pint) fresh raspberries (or frozen, no need to thaw)

Crumble:
1 cup all-purpose flour
½ cup old fashioned oats
1/3 cup granulated sugar
¼ cup packed dark brown sugar
Pinch of fine-grain kosher salt
1/2 teaspoon organic cinnamon powder
--(Or, ground cinnamon)
½ cup (1 cube) cold unsalted butter, cut into pea-sized cubes

METHOD:

Preheat oven to 350 degrees. Prepare a baking sheet lined with parchment paper or a Silpat liner, and set aside. Also, set aside 9 half-pint pre-sterilized Mason jars – no matter the shape (I used what I had onhand).

In a large bowl, combine all filling ingredients, except for the raspberries (I used unthawed frozen berries); toss to combine, and let macerate for 10 minutes. Toss again.  Fold in raspberries (fresh/frozen); using a typical tablespoon, spoon into Mason jars (Note: Over-stuff jars with filling, as it tends to shrink when cooling).


Prepare the Crumble mixture, and combine using a pastry cutter or two butter knives and cut to combine until crumble mixture appears as shown in photo.  Use a clean tablespoon and generously spoon crumble mixture atop filling to form slight mounds (the dessert will shrink when cooled, so don’t be shy with this topping mixture).

Notice the enhanced color the more it macerates...
Place filled jars atop the parchment/Siltpat-lined baking sheet in the preheated oven, and bake for 40 to 45 minutes, until golden and crisp and juices are slightly bubbling over edge.  Let stand for 10 minutes to set, and serve with French vanilla ice cream, if desired. ~ Enjoy!


~~~~~~~~~~~~~~
Tips:

1) Youre able to prepare these desserts well ahead of time and refrigerate, then bake in time for serving; they hold up phenomenally well.

2) If you have leftovers, simply microwave ½-pint jars for 30 seconds (placed inside a serving plate/bowl first) to warm.

3) To make ice cream scoop-able, microwave uncovered container for 10 seconds on high; it works and doesnt compromise its texture!

Read More..

Kamis, 08 Mei 2014

Flourless Chocolate Cake an easy gluten free recipe
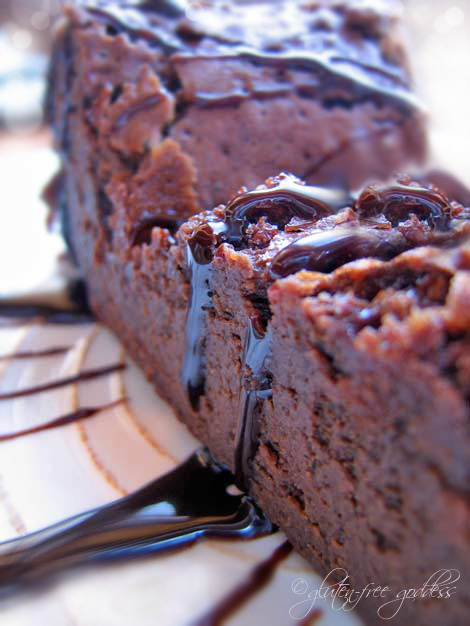
Flourless Chocolate Cake - easy and gluten-free!
Readers' hands-down favorite: my flourless chocolate cake.

Flourless Chocolate Heaven-

Perfection for a Gluten-Free Diet

This is my go-to dessert whenever I'm having guests. Everyone loves it. And the best part is- the recipe is inherently gluten-free. No substitutions. In fact, this is the same flourless cake I've been making for years. It never contained flour. The only thing I've tweaked post-celiac diagnosis is adding more coffee and vanilla.
Just because.

Read more + get the recipe >>
Read More..